Tags and variables
With Eurosign, you can add tags on your document in order to personalize it very quickly. These tags should be added in the content of your document. When you send it via Eurosign, the tags will be converted into fields that can be filled in by your recipients.
Base syntax
The syntax of Eurosign tags is inspired by HTML tags: surrounded by chevrons, an HTML tag includes a name and optional attributes.
Eurosign tags have to be enclosed in double curly braces ({{ and }}, unicode U+007B and U+007D).
Each tag contains a name, which refers to a field type (cf. Available fields)
and attributes, that specify certain parameters of the field (who it is for, is it required, etc.) (cf. Field attributes).
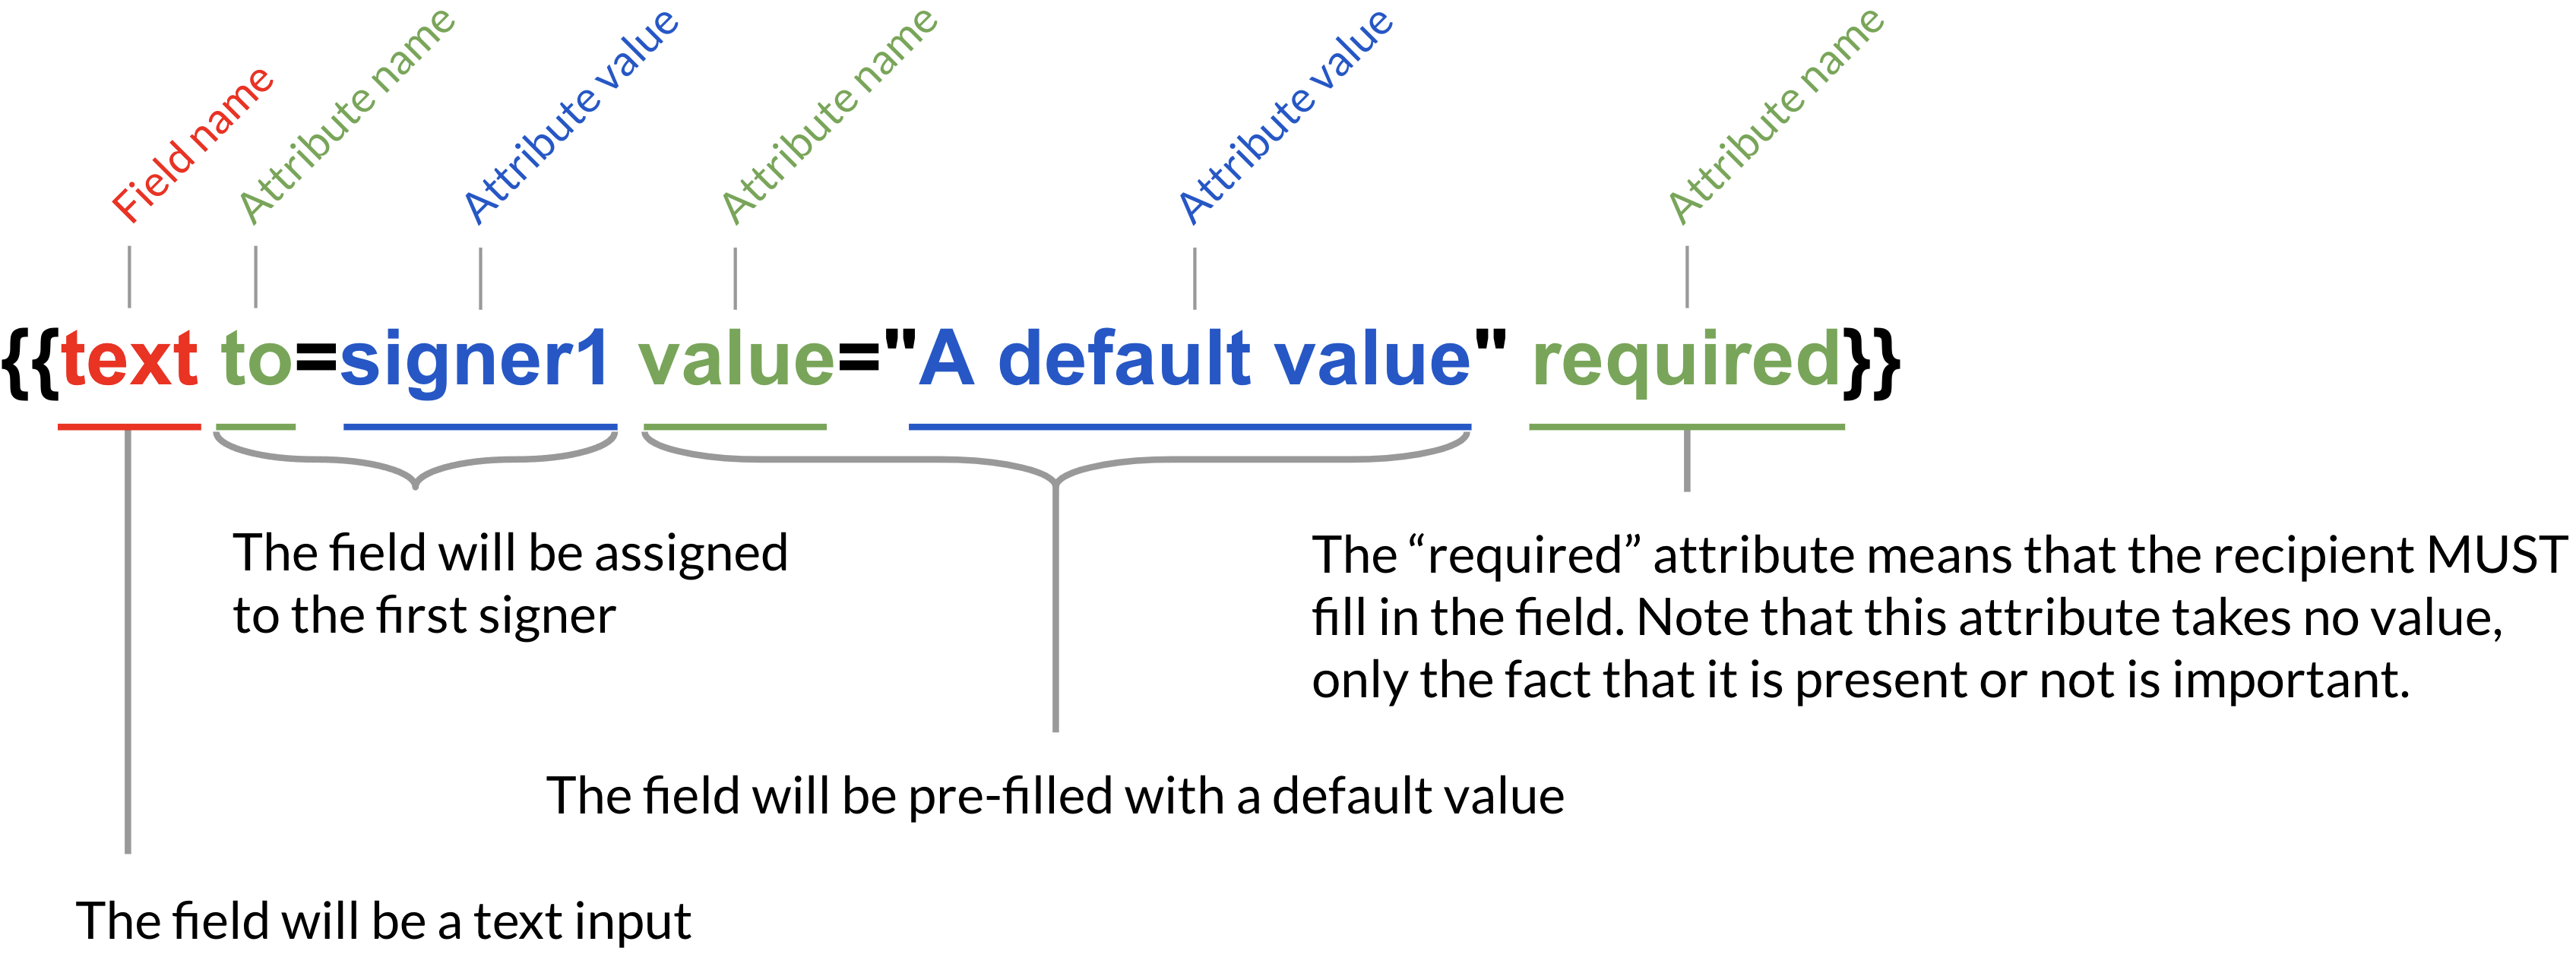
The created fields will automatically take the location and width of the original tag.
Each tag must be entirely on one line
In your document, the beginning and the end of a tag must be on the same line. Due to technical limitations related to the PDF format, if a tag at the end of a line is cut, it will not be taken into account.
You can use short formats for field names and attributes to make it easier to keep your tags on one line.
Available fields
To meet your needs, Eurosign offers several types of fields.
Short formats are available for each field type.
Their use is absolutely not mandatory, it is simply a shorter syntax to achieve the same result.
For example, the {{signature ...}} and {{sign ...}} tags will both produce a signature field.
Short formats can be used to reduce the size of your tags, and therefore help you keep them on a single line.
| Field | Description | Short formats |
|---|---|---|
checkbox |
A checkbox |
chbx
|
date |
A date field |
dt
|
dropdown |
A dropdown field |
select
ddwn
|
email |
An email address field |
em
@
|
file |
An attachment field | |
formula |
A formula field |
fm
|
initials |
An initials field |
in
|
number |
A number input |
nb
|
radio |
A radio button |
rd
|
signature |
A field where the recipient will apply his signature |
sign
sgn
|
stamp |
A field where the recipient will put a stamp |
stp
|
tel |
A phone number field | |
text |
A free text field |
txt
|
textarea |
A text area field |
txta
|
Field attributes
The attributes allow to give additional parameters to the field that will be created. Depending on the type of field, some attributes are mandatory. If a mandatory attribute is missing, the concerned tag will not be taken into account by Eurosign.
Attributes for each field
| Field | Attribute | Description | Value type | Default value | Required | Short formats |
|---|---|---|---|---|---|---|
| checkbox | to | The recipient of the field. If not set, the field will not be associated with any recipient (as if it did not exist) | Text | 0 | No | |
| name | name of the field | Text | No |
n
|
||
| checked | Whether the field is pre-checked or not | Boolean | No |
chk
chkd
|
||
| hint | A text that will appear when the recipient hovers the field | Text | No |
hi
|
||
| readonly | Whether the field is read-only for the recipient | Boolean | No |
!
|
||
| required | Whether the checkbox must be checked by the recipient | Boolean | No |
*
|
||
| date | to | The recipient of the field. If not set, the field will not be associated with any recipient (as if it did not exist) | Text | 0 | No | |
| name | name of the field | Text | No |
n
|
||
| hint | A text that will appear when the recipient hovers the field | Text | No |
hi
|
||
| min | The minimum value of the field | Date | No |
mn
|
||
| max | The maximum value of the field | Date | No |
mx
|
||
| readonly | Whether the field is read-only for the recipient | Boolean | No |
!
|
||
| required | Whether the recipient must fill in the field | Boolean | No |
*
|
||
| value | Default value of the field | Date | No |
val
v
|
||
| width | Width of the field. Use this attribute if you want to force a width in pixels (72 dpi) instead of letting the field take the width of the tag | Number | No |
w
|
||
| format | Date format | dateFormat | d/m/Y | No | ||
| dropdown | to | The recipient of the field. If not set, the field will not be associated with any recipient (as if it did not exist) | Text | 0 | No | |
| name | name of the field | Text | No |
n
|
||
| required | Whether the recipient must fill in the field | Boolean | No |
*
|
||
| options | Dropdown options in CSV format | Text | Yes |
opt
|
||
| to | The recipient of the field. If not set, the field will not be associated with any recipient (as if it did not exist) | Text | 0 | No | ||
| name | name of the field | Text | No |
n
|
||
| hint | A text that will appear when the recipient hovers the field | Text | No |
hi
|
||
| readonly | Whether the field is read-only for the recipient | Boolean | No |
!
|
||
| required | Whether the recipient must fill in the field | Boolean | No |
*
|
||
| value | Default value of the field | Email address | No |
val
v
|
||
| width | Width of the field. Use this attribute if you want to force a width in pixels (72 dpi) instead of letting the field take the width of the tag | Number | No |
w
|
||
| file | to | The recipient of the field. If not set, the field will not be associated with any recipient (as if it did not exist) | Text | 0 | No | |
| name | name of the field | Text | No |
n
|
||
| required | Whether the recipient must fill in the field | Boolean | No |
*
|
||
| hint | A text that will appear when the recipient hovers the field | Text | No |
hi
|
||
| formula | to | The recipient of the field. If not set, the field will not be associated with any recipient (as if it did not exist) | Text | 0 | No | |
| name | name of the field | Text | No |
n
|
||
| hint | A text that will appear when the recipient hovers the field | Text | No |
hi
|
||
| formula | Formula | Formula | Yes | |||
| initials | to | The recipient of the field. If not set, the field will not be associated with any recipient (as if it did not exist) | Text | 0 | No | |
| number | to | The recipient of the field. If not set, the field will not be associated with any recipient (as if it did not exist) | Text | 0 | No | |
| name | name of the field | Text | No |
n
|
||
| hint | A text that will appear when the recipient hovers the field | Text | No |
hi
|
||
| min | The minimum value of the field | Number | No |
mn
|
||
| max | The maximum value of the field | Number | No |
mx
|
||
| maxLength | Specifies the max number of characters or digits for this field | int | No | |||
| readonly | Whether the field is read-only for the recipient | Boolean | No |
!
|
||
| required | Whether the recipient must fill in the field | Boolean | No |
*
|
||
| step | Difference between two possible values, based on the default value if it is defined | Number | 1 | No | ||
| value | Default value of the field | Text | No |
val
v
|
||
| width | Width of the field. Use this attribute if you want to force a width in pixels (72 dpi) instead of letting the field take the width of the tag | Number | No |
w
|
||
| radio | to | The recipient of the field. If not set, the field will not be associated with any recipient (as if it did not exist) | Text | 0 | No | |
| name | The name of the radio group. All radio buttons with the same name are grouped and the recipient can pick only one value from the group | Text | Yes |
n
|
||
| checked | Whether the field is pre-checked or not | Boolean | No |
chk
chkd
|
||
| hint | A text that will appear when the recipient hovers the field | Text | No |
hi
|
||
| readonly | Whether the field is read-only for the recipient | Boolean | No |
!
|
||
| required | Whether the recipient must choose an option from the group. Only one radio needs to have this attribute to make the group mandatory | Boolean | No |
*
|
||
| value | The value of the radio button | Text | Yes |
val
v
|
||
| signature | to | The recipient of the field. If not set, the field will not be associated with any recipient (as if it did not exist) | Text | 0 | No | |
| stamp | to | The recipient of the field. If not set, the field will not be associated with any recipient (as if it did not exist) | Text | 0 | No | |
| name | name of the field | Text | No |
n
|
||
| hint | A text that will appear when the recipient hovers the field | Text | No |
hi
|
||
| required | Whether the recipient must fill in the field | Boolean | No |
*
|
||
| tel | to | The recipient of the field. If not set, the field will not be associated with any recipient (as if it did not exist) | Text | 0 | No | |
| name | name of the field | Text | No |
n
|
||
| required | Whether the recipient must fill in the field | Boolean | No |
*
|
||
| value | Default value of the field | tel | No |
val
v
|
||
| text | to | The recipient of the field. If not set, the field will not be associated with any recipient (as if it did not exist) | Text | 0 | No | |
| name | name of the field | Text | No |
n
|
||
| hint | A text that will appear when the recipient hovers the field | Text | No |
hi
|
||
| max | The maximum number of characters that the recipient can enter | int | No |
mx
|
||
| readonly | Whether the field is read-only for the recipient | Boolean | No |
!
|
||
| required | Whether the recipient must fill in the field | Boolean | No |
*
|
||
| value | Default value of the field | Text | No |
val
v
|
||
| width | Width of the field. Use this attribute if you want to force a width in pixels (72 dpi) instead of letting the field take the width of the tag | Number | No |
w
|
||
| textarea | to | The recipient of the field. If not set, the field will not be associated with any recipient (as if it did not exist) | Text | 0 | No | |
| name | name of the field | Text | No |
n
|
||
| height | Height of the field. Use this attribute if you want to force a height in pixels (72 dpi) instead of letting the field take the height of the tag | Number | No |
h
|
||
| hint | A text that will appear when the recipient hovers the field | Text | No |
hi
|
||
| max | The maximum number of characters that the recipient can enter | int | No |
mx
|
||
| readonly | Whether the field is read-only for the recipient | Boolean | No |
!
|
||
| required | Whether the recipient must fill in the field | Boolean | No |
*
|
||
| value | Default value of the field | Text | No |
val
v
|
||
| width | Width of the field. Use this attribute if you want to force a width in pixels (72 dpi) instead of letting the field take the width of the tag | Number | No |
w
|
Date values must be written with the YYYY-MM-DD format
(example with today date (UTC): 2026-06-16)
Boolean attributes do not need a value. For example, the {{text to=signer1 required}} tag means that the field will be required.
Special characters
Values that contain spaces must be enclosed in quotes. You can use either single or double quotes, as long as you use the same ones to open and close an attribute value.
To make it easier to use the Eurosign tag syntax with software such as Word or LibreOffice, Eurosign considers the following characters as quotation marks:
| Character | Description | Unicode |
|---|---|---|
' |
Apostrophe |
U+0027 |
‘ |
Left single quotation mark |
U+2018 |
’ |
Right single quotation mark |
U+2019 |
| Character | Description | Unicode |
|---|---|---|
" |
Quotation mark |
U+0022 |
“ |
Left double quotation mark |
U+201C |
” |
Right double quotation mark |
U+201D |
Tip: You can check the unicode code of a character by copy-pasting it here.
If you need to put special characters in the value of an attribute, you can escape them with a backslash \.
For example: {{text to=signer1 value="The \"yearly\" contract"}}
will result in a field with the following default value: The "yearly" contract.
Identify a recipient in a tag
As seen in the Field attributes section, the to attribute is used to associate a tag with a recipient.
The value of the to attribute must be of the form signerX or sX, where X is the signatory number according to the order in which the signatories were added to the signature request.
To associate a tag with the first signatory, the value of the to attribute must therefore be signer1 or s1, signer2 or s2 for the second, and so on.
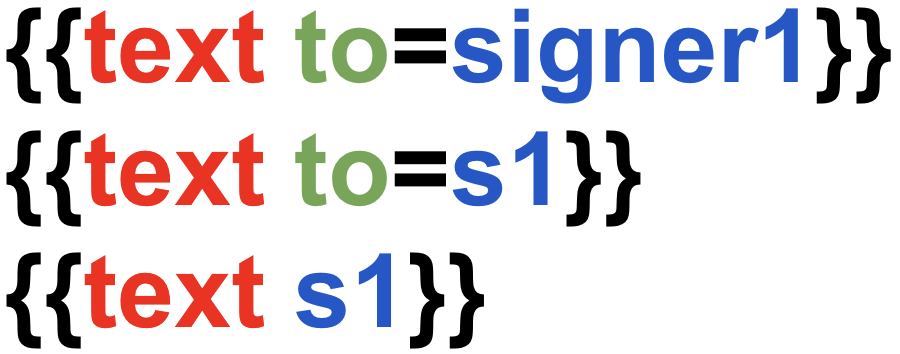
A particular short format is available for the to attribute: it is possible to write directly its value, without preceding it with to=.
Thus, in a tag, any value that is not preceded by an attribute name and the character = is automatically implicitly considered as the value of the to attribute.
For example:
If you want to use recipient-related pre-defined variables, you will also need to identify recipients with this syntax. In this case, you may need to target not only a signer, but also an approver, an observer, or even a recipient by their index, regardless of their role.
Thus, similarly to the signatories, you can target :
- Approvers with
approver1/a1,approver2/a2... - Observers with
observer1/o1,observer2/o2...
If you want to target a recipient by their index, whatever their role, you can just use a numeric value :
1 for the first recipient, 2 for the second, etc.
Let's take an example by considering a document with two signatories, two approvers and an observer. This document would first be sent to an observer and a first approver, then to the two signatories, and finally to the second approver. With such a configuration, here are the possible ways to identify each recipient:
| Recipient | Numeric identifier | Role-based identifier |
|---|---|---|
| Observer | 1 | observer1 / o1 |
| Approver 1 | 2 | approver1 / a1 |
| Signer 1 | 3 | signer1 / s1 |
| Signer 2 | 4 | signer2 / s2 |
| Approver 2 | 5 | approver2 / a2 |
Thus, to create a text field for the second signer, you can use either the role-based identifier
({{text to=signer2}} / {{text to=s2}} / {{text s2}}),
or the numeric identifier ({{text to=4}} / {{text 4}}).
Using variables
Variables allow you to dynamically change values in your tags. They are particularly useful when sending via the Eurosign API, to dynamically pre-fill a field.
Syntax
Variables have to be enclosed in single curly braces ({ and }).
They can be used as attribute values in tags.
For example, if you want to set a variable for the default value of the first text field we saw here, you will do so as follows:

The values of the variables must be provided via the API at the time of the signature request creation. If a variable is present in your document but its value has not been provided at signature request creation time, it will be replaced by an empty string (as if the attribute had no value).
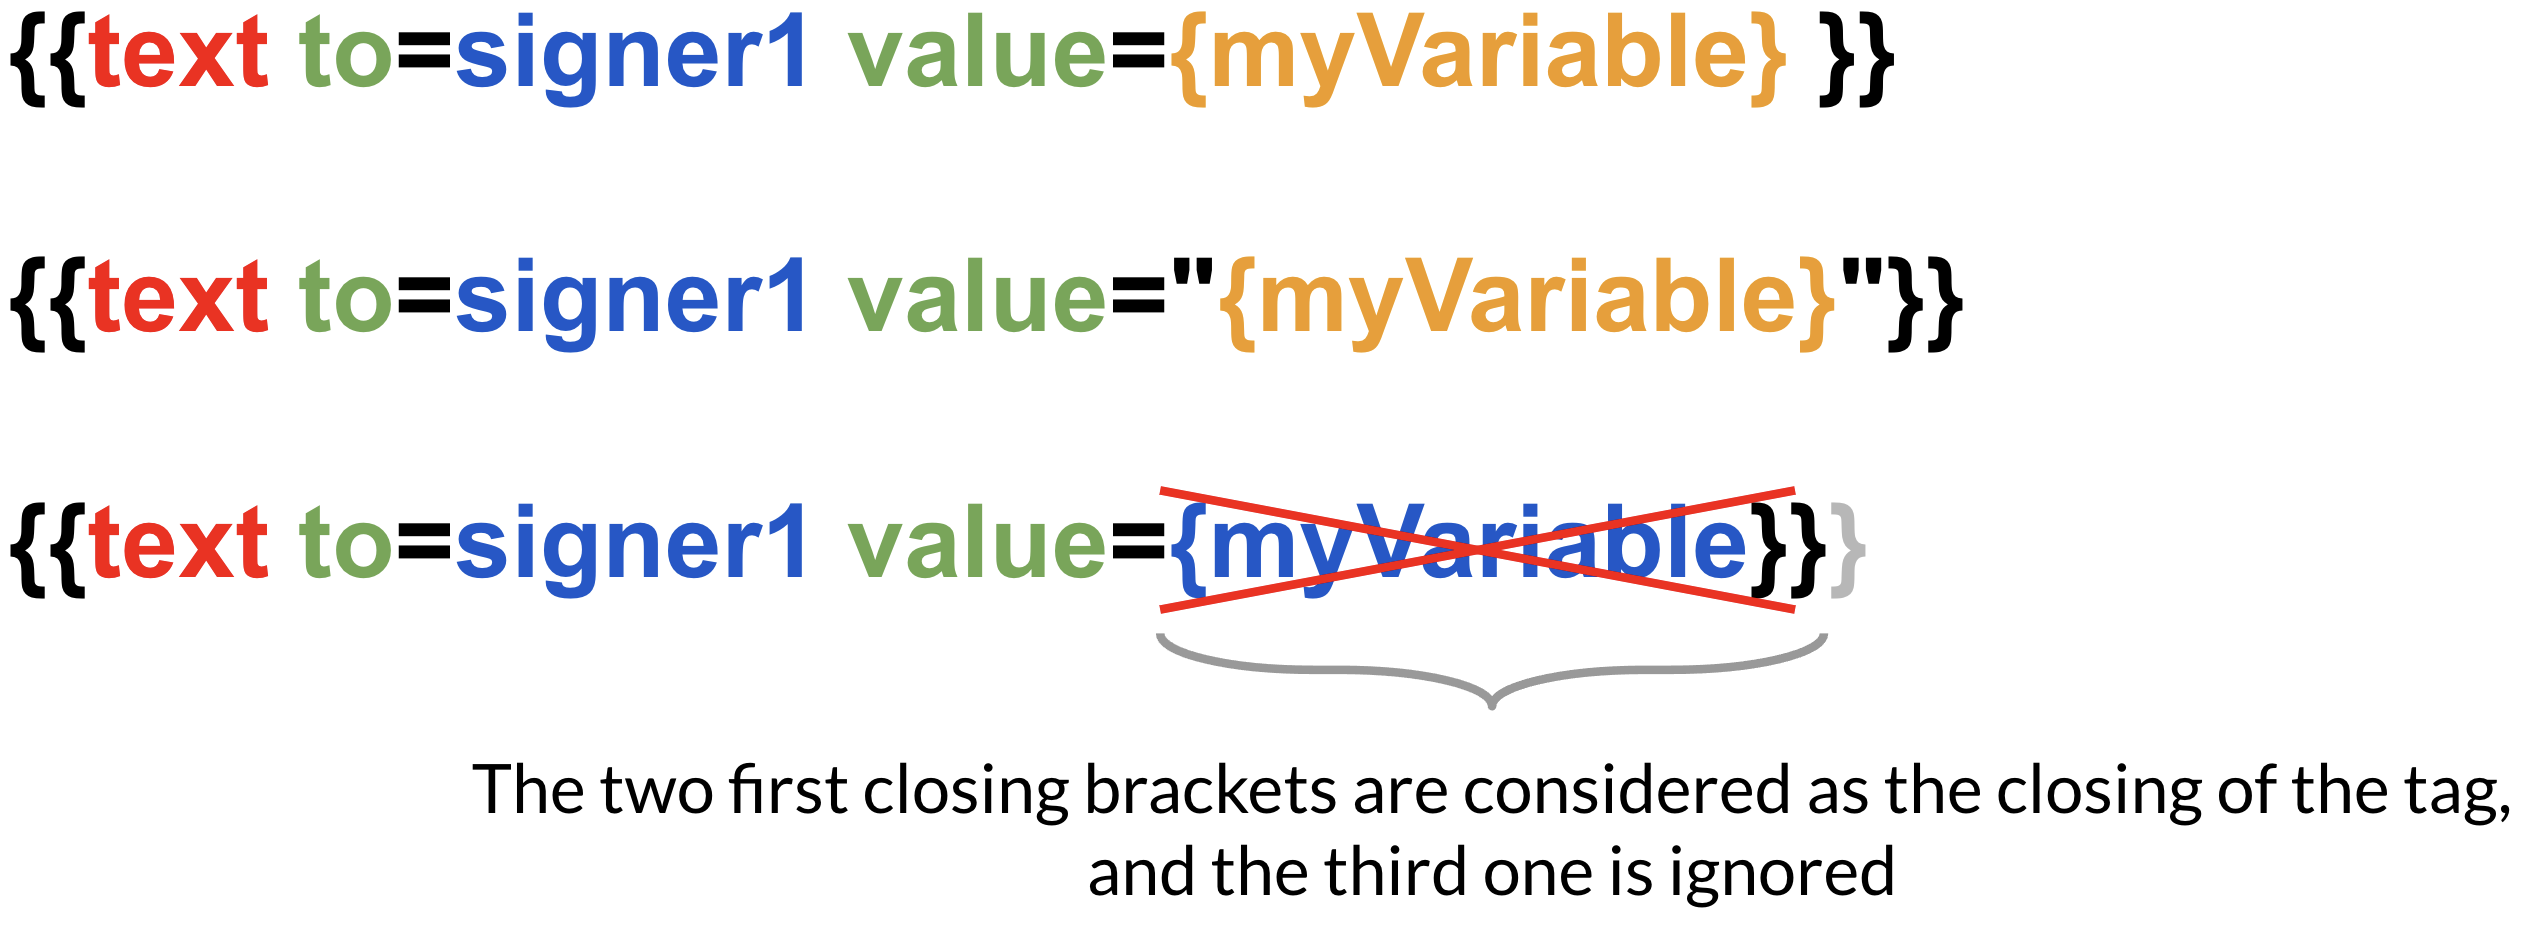
The closing of a variable and the closing of the tag must be separated
Be careful when a variable is used just before the tag closes }},
the closing bracket of the variable must not be directly next to the closing brackets of the tag.
Consider separating them with a space, or surrounding the variable with single or double quotes.
Predefined variables
Some predefined variables are automatically available for all sent documents. You can use them in your document without having to give them a value beforehand.
Predefined variables are prefixed by a recipient identifier. For example, the variable {signer2.firstname}
will be replaced by the firstname of the second recipient. The variable {a1.lastname} will be replaced by
the lastname of the first approver. The variable {2.email} will be replaced by the email address of the 2nd
recipient, whatever their role (cf. Identify a recipient in a tag).
| Field | Variable | Description | Exemple |
|---|---|---|---|
text |
firstname |
The firstname of the recipient | {{text s1 value={s1.firstname} }} |
text |
lastname |
The lastname of the recipient | {{text s1 value={s1.lastname} }} |
text |
fullname |
The full name (firstname and lastname) of the recipient | {{text s1 value={s1.fullname} }} |
textemail |
email |
The email address of the recipient | {{email s1 value={s1.email} }} |
date |
viewDate |
The current date the recipient views the document | {{date s1 value={s1.viewDate} }} |
text |
viewTime |
The current time the recipient views the document | {{text s1 value={s1.viewTime} }} |
date |
signDate |
The date of signing a document by a recipient | {{date s1 value={s1.signDate} }} |
Some examples
In order to make all this information more clear, here are some examples of tags that you may need to insert in your documents.
-
{{signature to="signer2"}}–{{sign to=s2}}–{{sign s2}}: 3 ways to create a signature field for the second signer -
{{text to="signer2"}}–{{text to=signer2}}–{{text to=s2}}–{{text s2}}: 4 ways to create a text field for the second signer -
{{text s1 required}}: A required text field for the first signer -
{{text s1 value="Developer"}}: A text field for the first signer, pre-filled with the valueDeveloper
-
{{text s1 value="Developer" readonly}}: Same as above, but the field will be read-only (the recipient will not be able to change its value) -
{{number s2 min=0 max=1000 required}}: A required number field for the second signer, with 0 as minimum value and 1000 as maximum value (inclusive). -
{{stamp s1 required}}: A field where the first signer will have to upload a stamp image -
{{email s2 required}}: A field where the second signer will have to write an email address -
{{text s1 width=300}}: A text field for the first signer with a fixed width of 300 pixels -
{{text s1 value={s1.firstname} }}: A field for the first signer, pre-filled with the firstname of the first signer -
{{number s1 min=0 max=1000 required width=200 hint="Enter amount here"}}: A 200 pixels wide required number field where the first recipient will have to write a number between 0 and 1000, and a tooltip containingEnter the amount here
that appears when he hovers over the field. -
{{radio s1 name="payment_method" value="credit_card"}}Three grouped radio fields that allow the first signer to select a payment method from three choices
{{radio s1 name="payment_method" value="check"}}
{{radio s1 name="payment_method" value="transfer"}}
-
{{radio s1 name="payment_method" value="credit_card" required}}Same as above, but the choice is mandatory (the first signer have to select an option)
{{radio s1 name="payment_method" value="check"}}
{{radio s1 name="payment_method" value="transfer"}}